碎片效果,用PS制作仿电影效果的碎片人像
2022-12-25 19:41:37
来源/作者: /
己有:26人学习过
本篇教程通过PS制作仿电影效果的碎片人像,我们看过很多科幻电影,此类效果我们在电影里经常见,那么如果想在PS里制作是如何操作呢,教程详细的教大家,步骤比较多,同学们操作起来得有耐心哟,感兴趣的同学们一起来制作一下这种创意效果碎片人像吧,学会后可以在多方面进行应用,快来制作一下吧。
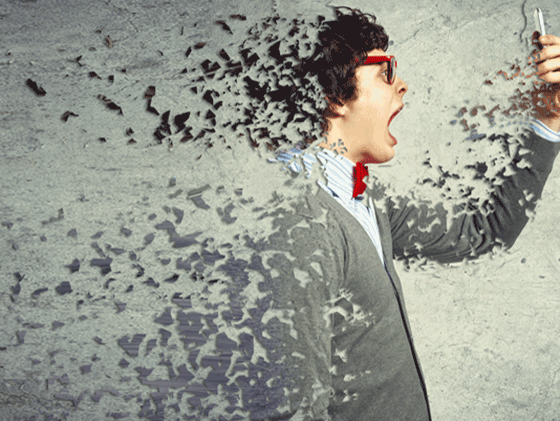
效果图:
练习素材:

操作步骤:
1首先我们打开需要做特效的图

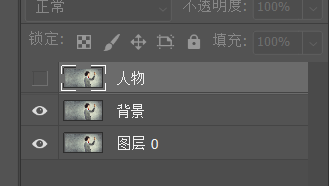
2然后选中图层0按Ctrl+J
复制一个图层来进行操作
原图留作备份
把拷贝得到的图层重命名为“背景”
再复制一个命名为“人物”
并将人物图层隐藏
3接下里我们要再背景图层上
移去人物的画面
方法就是使用套索工具

将图中的人物框选起来
不需要太过细致
只要将人物全部选择到就行

4这里可以看到人物周围的虚线
说明我们已经选中了这块区域
然后点击编辑-填充
选择内容识别的填充方式

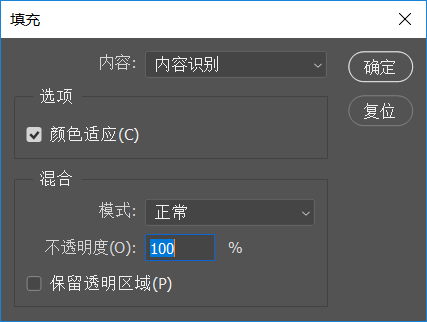
确定之后PS会自动帮你把人物给“和谐”掉

上一篇:二次元效果,教你调出日系动漫色调
相关推荐

PS照片处理教程:几步让模糊图片变

PS照片处理教程:利用对比色修复偏

PS照片处理教程:去除漂亮美眉身上

ps合成火炎人像效果教程

如何用PS把浑浊的风景照片调出通透清晰

PS商业修图师对人物头发进行精修教程

如何用PS打造出明亮而有神的眼睛效果

PS商业修图给人像增强光影质感的方法介绍


