火焰字,在ps中制作炫酷的火焰字体
2022-12-25 10:00:19
来源/作者: /
己有:22人学习过
本篇教程通过ps制作一种火焰效果的字体,我们在网站中已经学过很多了,本篇教程也是比较简单,首先我们需要新建一个背景文档,任意输入自己想要的文字。再点击文字图层,选择混合模式,勾选外发光,根据图层样式和教程所述一步一步的进行制作,你会看到火焰的感觉会一步一步的显示出来,像这种效果的文字,在我们的中,火焰字的教程有很多,同学们可以根据需求来进行一个学习和练习。


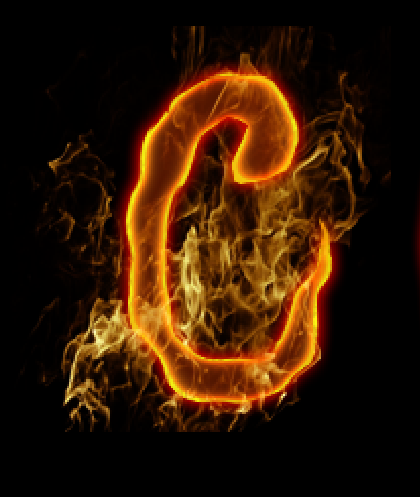


效果图:
 搜索公众号photoshop教程论坛,免费领取自学福利
操作步骤:
1、新建黑色背景文档。
2、输入文字。
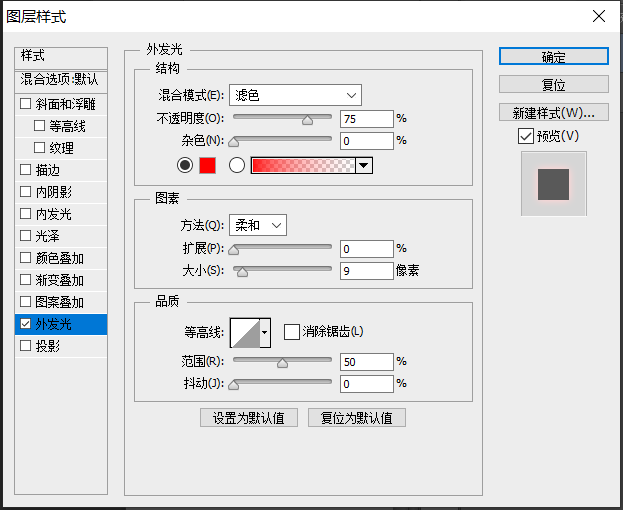
3、右键点击文字层选择混合模式。勾选外发光。设置如图。
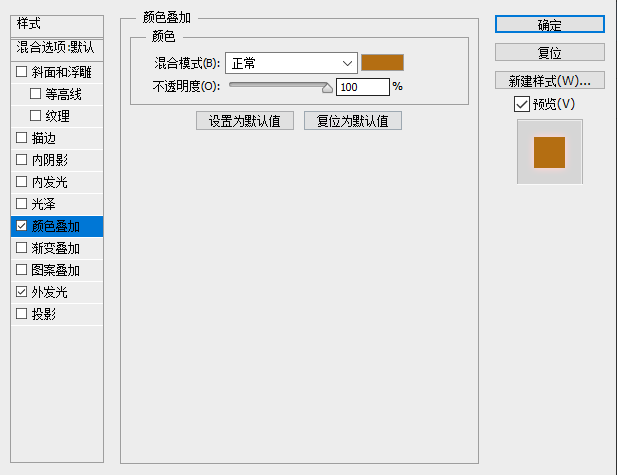
4、勾选颜色叠加,设置如图。
5、勾选光泽,设置如图。
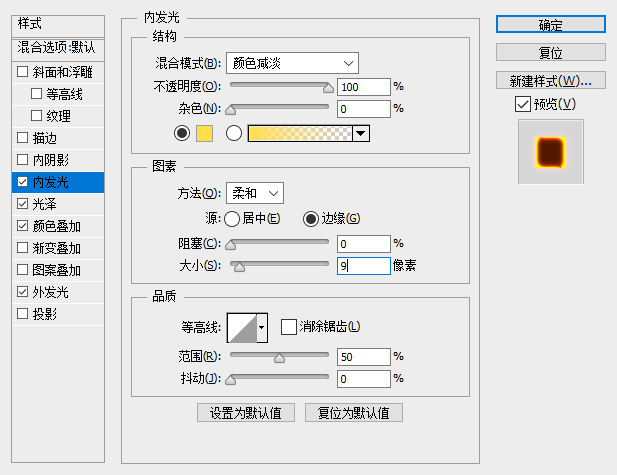
6、勾选内发光,设置如下,混合模式为颜色减淡。
7、执行滤镜-液化。选择向前变形工具。键入下面设置。在文字边缘制造波浪效果。
8、打开火焰素材。进入通道面板,选择绿色层。CTRL+左键点击绿色层载入高光区。
9、回到层面板,适用移动工具,将选中的区域移动到刚才的文字文件中,将火焰置于文字层上方。
10、适用15像素橡皮擦工具,擦掉所有多余的火焰,只留下在文字周围缭绕的火焰。
11、复制火焰层。将原火焰层的不透明度设置为30%。将复制得到的层的混合模式设置为叠加。
12、多重复几次该过程,添加更多火焰。
13、新建图层,用画笔画几个红点。
14、将本层混合模式设为颜色减淡。
完成:
搜索公众号photoshop教程论坛,免费领取自学福利
下一篇:PS+AI设计霓虹灯复古字
相关推荐

ps如何做动画火焰文字

金属字,制作金属纹理的火焰字教程

金属字,设计烧红的金属火焰字教程

金属字,复古机械字体设计教程

彩绘艺术字, PS液化工具制作彩绘背景设计教程

Photoshop制作非常流行的金沙立体字,细腻的金沙字体,金粉字。

Photoshop制作金色的海报标题文字教程

Photoshop使用笔刷制作书法艺术字教程


