[非主流PS教程] VONAI效果图制作全解完整版Ⅱ!!第二部!
2022-12-25 16:51:43
来源/作者: /
己有:14人学习过
VONAI效果图制作全解完整版Ⅱ!!第二部!这是第二次写关于VONAI的教程了,不同于第一个教程(VONAI效果图制作全解完整版)的地方是:
1,第一个使用于所有相片,效果不是很夸张;第二个用的图必须要画面冲击力强烈的,画面元素与元素之间有主次关系,主要突现脸部,进行面部特写处理。
2,使用光照效果,突出主体部分;背静浓烈,与光亮部分形成对比,形势缓和;明暗交界线较明显;
3,画面风格感要强一点,适用于黑色背景;
4,主体边缘模糊,与暗景连成一片。
---------------------------------------------
要用的工具:
1,Photo shop;
2,大红花笔刷。 (Rose)
请点这里下载:大红花笔刷下载
---------------------------------------------

教程,开始:
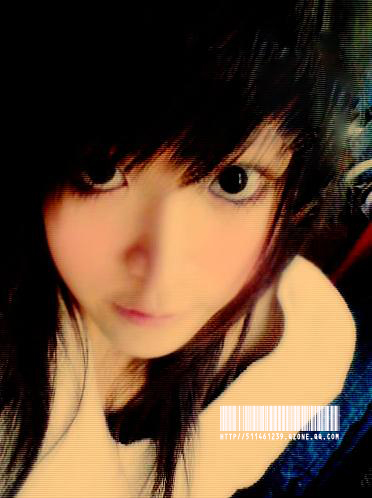
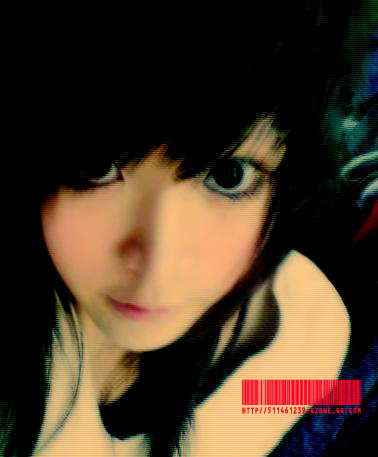
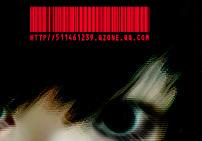
部分原图:

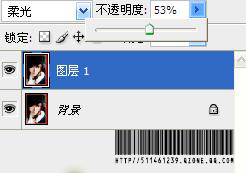
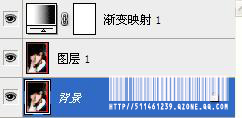
1,打开图片,Ctrl J复制背景图层,混合模式为叠加,不透明度调整为53%
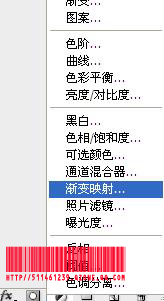
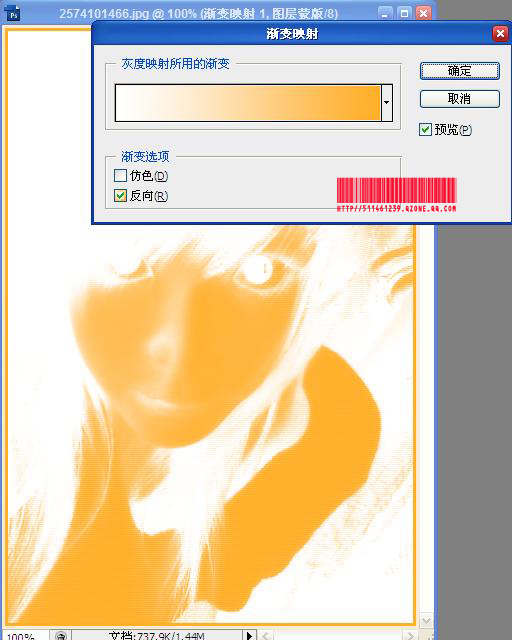
2,点击图层调整工具(半黑半白的圈圈),选择渐变映射。
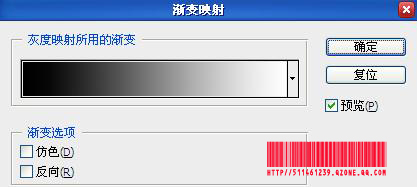
3,弹出窗口,点击渐变长条。
4,弹出窗口,点击左下角的色标(全黑的笔),再点击颜色旁边的黑长条。
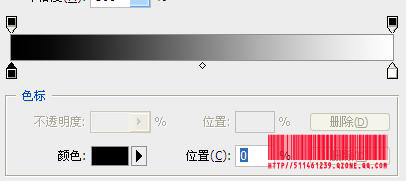
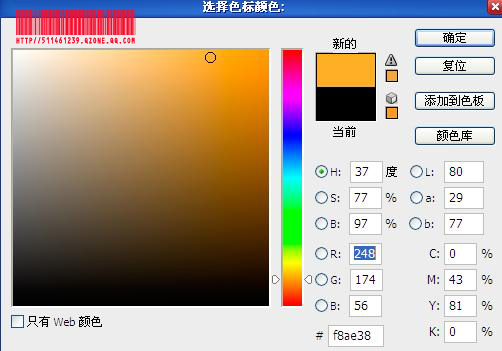
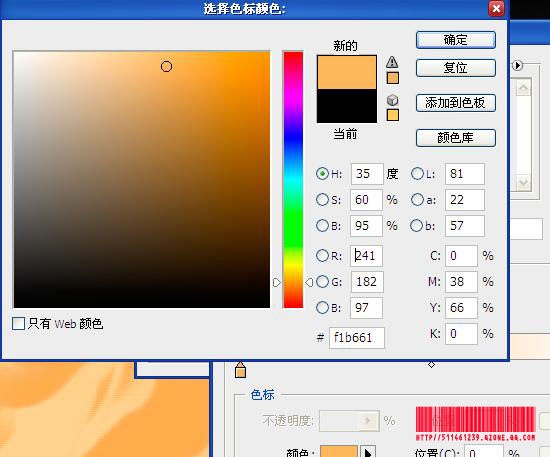
5,弹出窗口,设置如下。
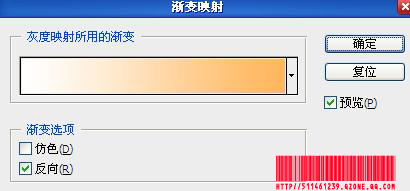
6,步骤5确定后返回渐变映射窗口,选择反向,为的是填充画面高光的部分。
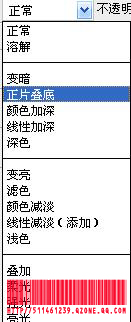
图层的混合模式为正片叠底
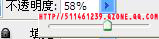
不透明度为58%
图像效果如下:
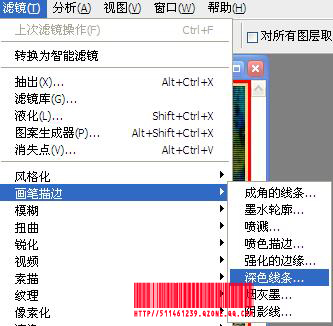
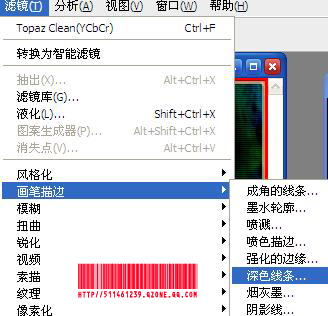
7,选择背景图层
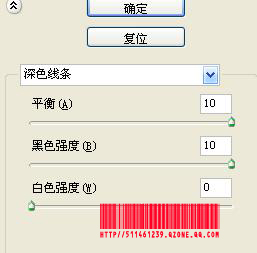
滤镜-画笔描边-深色线条。
数据如下:
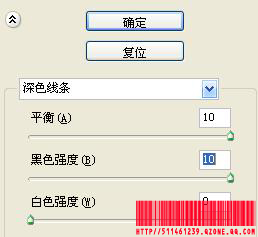
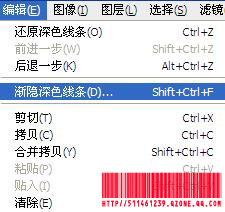
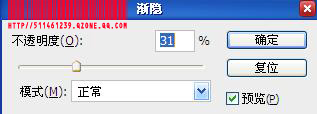
为了保证画面不被滤镜大面积破坏,消退一些深色线条效果,
编辑-渐隐深色线条
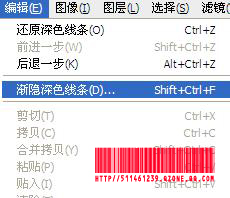
数据调整如下:
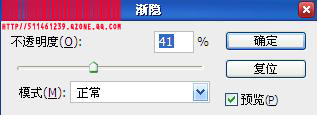
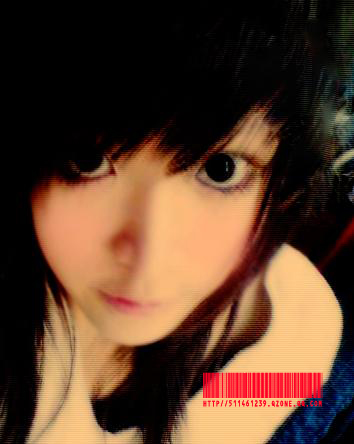
调整后效果如下:
8,进行色阶调整
图像-调整-色阶。
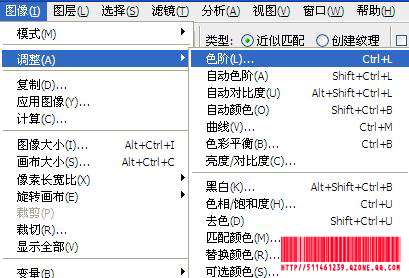
只调整通道RGB和通道红,数据如下:

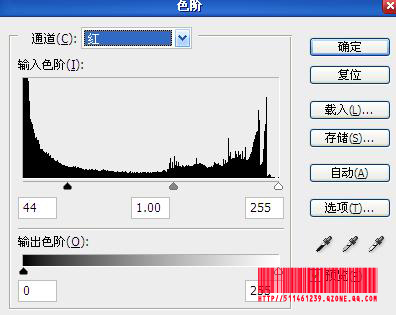
效果如下:
9,对人物眼睛/睫毛调整
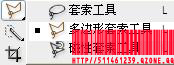
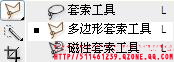
在工具栏上选择多边形套索工具
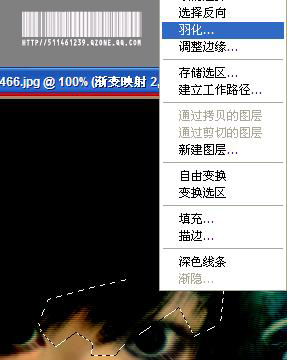
圈出眼睛和睫毛,(记住,起始要有终,圈出的轮廓是全封闭图形)
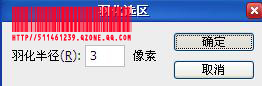
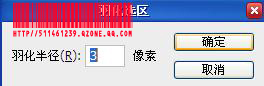
右击选择羽化,如图
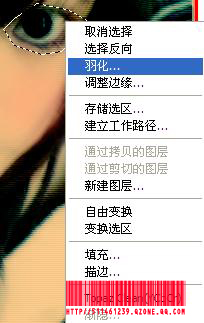
羽化3像素
进行深色线条。 滤镜-画笔描边-深色线条。
调整数据如下:
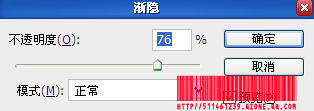
渐隐深色线条。编辑-渐隐深色线条
数据调整如下,不透明度为76%(可自行调整)
另一只眼睛也一样。
Ctrl Shift E合并所有图层。
10,对高光部分再次进行色彩管理。
返回图层一栏,渐变映射。
和上次一样,点击渐变长条,弹出此窗口,颜色设置如下:
选择反色。(高光区)
图层混合模式为 正片叠底

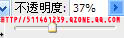
不透明度为37%
11,细节处理。
在工具栏上选择多边形套索工具
圈出额头上的刘海,右点选择羽化
羽化3像素
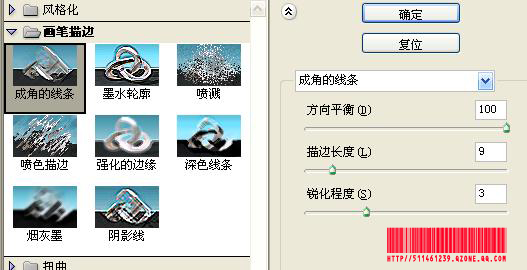
滤镜-画笔描边-成角的线条,调整数据如下:
效果如下:
编辑-渐隐成角的线条,调整数据如下:
12,再次进行色阶调整。
图像-调整-色阶,只调整通道红,数据如下:

图像效果如下:
13,对图像进行裁剪。(略)

裁剪后:
14,为使画面协调,刷上ROSE笔刷(我选择的是两朵的,560的那个)
自己根据图片调整。
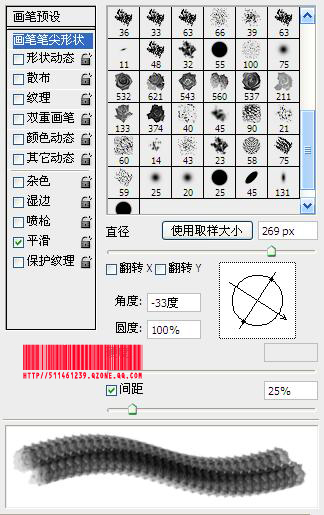
效果如下:

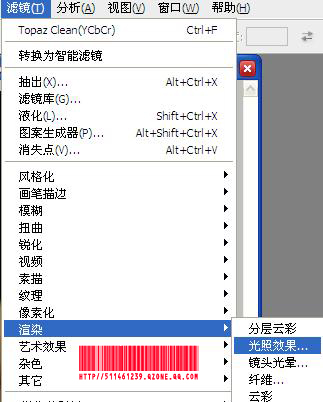
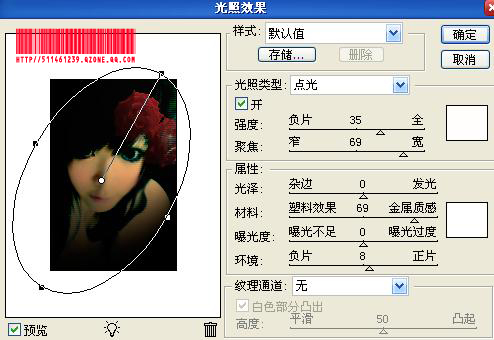
15,最后,进行光照效果,为的是能更好地突出光亮部分
滤镜-渲染-光照效果。
我调整的是这样的
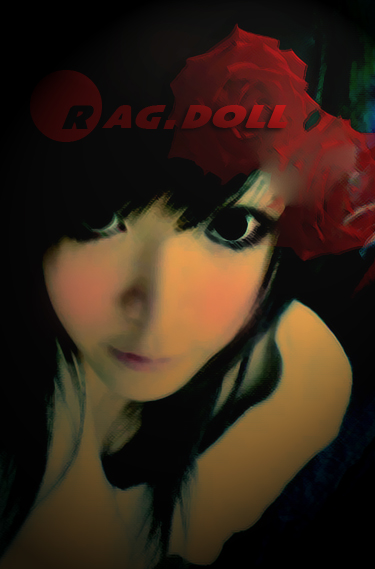
16,加上字,完成。(注意你的光照是从哪个方向射过来的,字体部分明暗要调整)
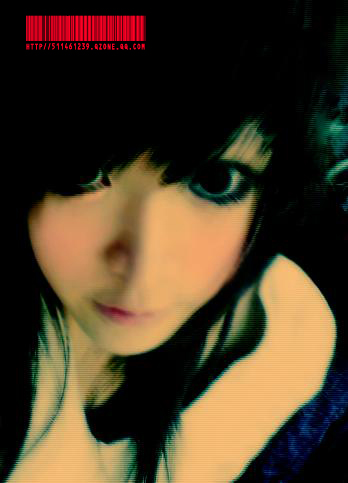
最后效果图1

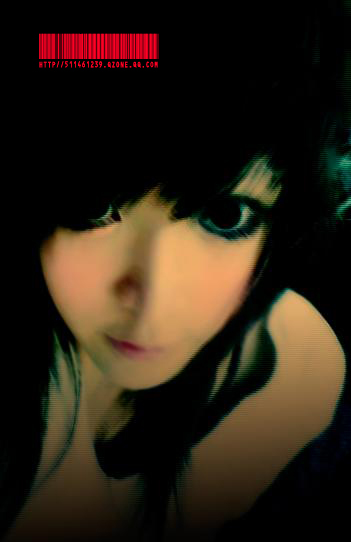
效果图二
1,第一个使用于所有相片,效果不是很夸张;第二个用的图必须要画面冲击力强烈的,画面元素与元素之间有主次关系,主要突现脸部,进行面部特写处理。
2,使用光照效果,突出主体部分;背静浓烈,与光亮部分形成对比,形势缓和;明暗交界线较明显;
3,画面风格感要强一点,适用于黑色背景;
4,主体边缘模糊,与暗景连成一片。
---------------------------------------------
要用的工具:
1,Photo shop;
2,大红花笔刷。 (Rose)
请点这里下载:大红花笔刷下载
---------------------------------------------
教程,开始:
部分原图:
1,打开图片,Ctrl J复制背景图层,混合模式为叠加,不透明度调整为53%
2,点击图层调整工具(半黑半白的圈圈),选择渐变映射。
3,弹出窗口,点击渐变长条。
4,弹出窗口,点击左下角的色标(全黑的笔),再点击颜色旁边的黑长条。
5,弹出窗口,设置如下。
6,步骤5确定后返回渐变映射窗口,选择反向,为的是填充画面高光的部分。
图层的混合模式为正片叠底
不透明度为58%
图像效果如下:
7,选择背景图层
滤镜-画笔描边-深色线条。
数据如下:
为了保证画面不被滤镜大面积破坏,消退一些深色线条效果,
编辑-渐隐深色线条
数据调整如下:
调整后效果如下:
8,进行色阶调整
图像-调整-色阶。
只调整通道RGB和通道红,数据如下:
效果如下:
9,对人物眼睛/睫毛调整
在工具栏上选择多边形套索工具
圈出眼睛和睫毛,(记住,起始要有终,圈出的轮廓是全封闭图形)
右击选择羽化,如图
羽化3像素
进行深色线条。 滤镜-画笔描边-深色线条。
调整数据如下:
渐隐深色线条。编辑-渐隐深色线条
数据调整如下,不透明度为76%(可自行调整)
另一只眼睛也一样。
Ctrl Shift E合并所有图层。
10,对高光部分再次进行色彩管理。
返回图层一栏,渐变映射。
和上次一样,点击渐变长条,弹出此窗口,颜色设置如下:
选择反色。(高光区)
图层混合模式为 正片叠底
不透明度为37%
11,细节处理。
在工具栏上选择多边形套索工具
圈出额头上的刘海,右点选择羽化
羽化3像素
滤镜-画笔描边-成角的线条,调整数据如下:
效果如下:
编辑-渐隐成角的线条,调整数据如下:
12,再次进行色阶调整。
图像-调整-色阶,只调整通道红,数据如下:
图像效果如下:
13,对图像进行裁剪。(略)
裁剪后:
14,为使画面协调,刷上ROSE笔刷(我选择的是两朵的,560的那个)
自己根据图片调整。
效果如下:
15,最后,进行光照效果,为的是能更好地突出光亮部分
滤镜-渲染-光照效果。
我调整的是这样的
16,加上字,完成。(注意你的光照是从哪个方向射过来的,字体部分明暗要调整)
最后效果图1
效果图二
相关推荐

Photoshop快速修复强光照射的非主

调整照片过爆问题<比较容易控制,简单

PS实用教程:ps修复偏色风景照片

精细调整还你山清水秀——桔子教程

ps调出高级复古欧美色调教程

PS夜景美化:调出唯美蓝色夜景灯光照片效果

调出绚丽蓝天白云山水风景图片的PS教程

调出金色晨曦森林儿童背影照片的PS教程


