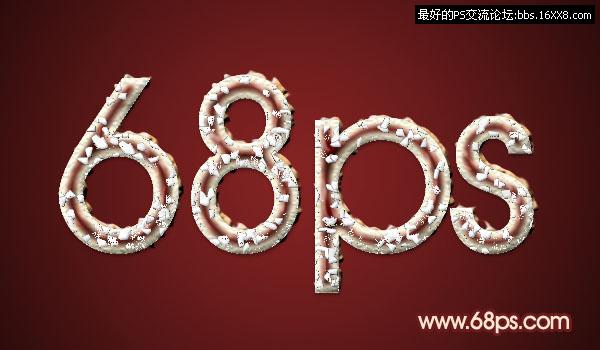
朱古力饼干字
2022-12-25 14:17:16
来源/作者: /
己有:28人学习过
9、回到文字图层,把文字图层显示处理,把文字复制一层,双击图层调出图层样式,参数设置如图17-19,效果如图20。
![](https://img.lvups.com/d/file/bigpic/2022/12/25/wfnlotof4wb.jpg)
<图17>
![](https://img.lvups.com/d/file/bigpic/2022/12/25/4qc4tm14gk2.jpg)
<图18>
![](https://img.lvups.com/d/file/bigpic/2022/12/25/mgjjekmd4fx.jpg)
<图19>
![](https://img.lvups.com/d/file/bigpic/2022/12/25/bnxiaeevvc0.jpg)
<图20>
10、再回到原文字图层,把文字复制一层,按右键栅格化图层,然后把文字向右和向上稍微移几个像素,如图21。
![](https://img.lvups.com/d/file/bigpic/2022/12/25/jb2f4yjrk02.jpg)
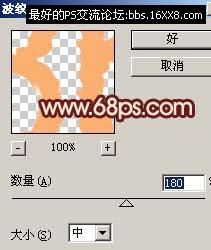
<图21> 11、执行:滤镜 > 扭曲 > 波纹,参数设置如图22。
![](https://img.lvups.com/d/file/bigpic/2022/12/25/1mtftghbcb5.jpg)
<图22>
12、双击图层调出图层样式,参数设置如图23-25,确定后完成最终效果。
![](https://img.lvups.com/d/file/bigpic/2022/12/25/zdep2nrxeor.jpg)
<图23>
![](https://img.lvups.com/d/file/bigpic/2022/12/25/epheppzlstb.jpg)
<图24>
![](https://img.lvups.com/d/file/bigpic/2022/12/25/zeopi2z0f41.jpg)
<图25>
![](https://img.lvups.com/d/file/bigpic/2022/12/25/vsqw4swdmeb.jpg)
<图26>
下一篇:简单的黄金字效