用photoshop做韩式风格的文字标签
2022-12-25 12:18:05
来源/作者: /
己有:25人学习过
作者河马 出处:IT世界
效果图:

1、创建一个新的photoshop文档,然后输入文字,如图所示。

2、在文字图层的下方创建一个新图层,然后使用“椭圆工具”画出一些椭圆,如图所示。


3、回到文字的图层,重新设置文字的颜色,并设置前景色为白色,然后选择“渐变工具”设置由“白色—透明”的渐变效果,如图所示。


4、在文字图层下方再创建一个新图层,设置其混合模式为“叠加”,然后按着Ctrl键单击“图层1”载入选区,使用“渐变工具”由下向上拖动出渐变效果,如图所示。
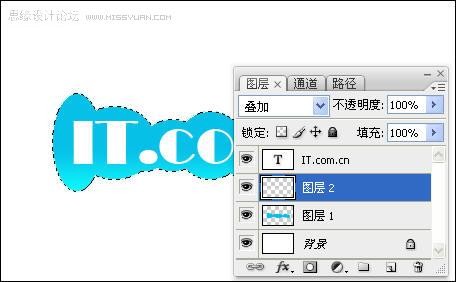
5、选择“椭圆选框工具”并设置其属性,然后编辑选区,如图所示。


编辑选区后:

, 6、使用“渐变工具”由上向下拖动出渐变效果,如图所示。

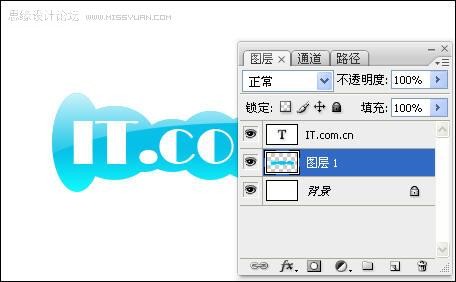
7、按下Ctrl+E快捷键合并文字图层和背景图层以外的所有图层到“图层1”,如图所示。
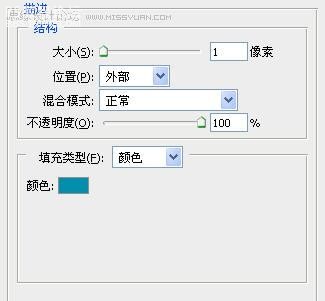
8、选择“图层1”,然后在菜单栏中选择“图层—图层样式—描边”命令打开“图层样式”对话框,设置描边效果,如图所示。
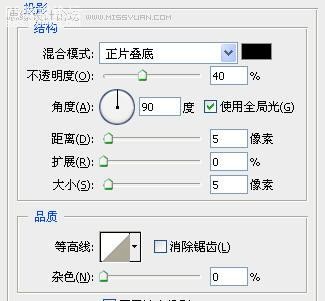
9、在“图层样式”对话框的左边选择“投影”选项,设置投影效果,如图所示。
设置图层样式后的效果:

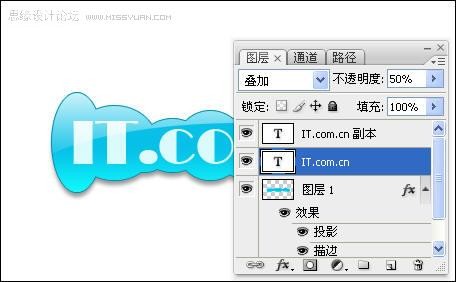
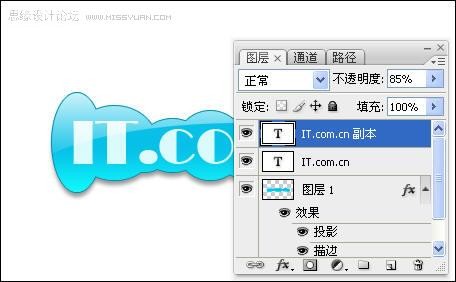
10、选择文字图层,按下Ctrl+J快捷复制出副本图层,然后设置文字图层的混合模式为“叠加”,不透明度为“50%”副本图层的不透明度为“85%”,如图所示。
, 11、在背景图层的上方创建一个新图层,然后使用“圆角矩形工具”创建一圆角矩形,如图所示。
效果图:
1、创建一个新的photoshop文档,然后输入文字,如图所示。
2、在文字图层的下方创建一个新图层,然后使用“椭圆工具”画出一些椭圆,如图所示。
3、回到文字的图层,重新设置文字的颜色,并设置前景色为白色,然后选择“渐变工具”设置由“白色—透明”的渐变效果,如图所示。
4、在文字图层下方再创建一个新图层,设置其混合模式为“叠加”,然后按着Ctrl键单击“图层1”载入选区,使用“渐变工具”由下向上拖动出渐变效果,如图所示。
5、选择“椭圆选框工具”并设置其属性,然后编辑选区,如图所示。
编辑选区后:
, 6、使用“渐变工具”由上向下拖动出渐变效果,如图所示。
7、按下Ctrl+E快捷键合并文字图层和背景图层以外的所有图层到“图层1”,如图所示。
8、选择“图层1”,然后在菜单栏中选择“图层—图层样式—描边”命令打开“图层样式”对话框,设置描边效果,如图所示。
9、在“图层样式”对话框的左边选择“投影”选项,设置投影效果,如图所示。
设置图层样式后的效果:
10、选择文字图层,按下Ctrl+J快捷复制出副本图层,然后设置文字图层的混合模式为“叠加”,不透明度为“50%”副本图层的不透明度为“85%”,如图所示。
, 11、在背景图层的上方创建一个新图层,然后使用“圆角矩形工具”创建一圆角矩形,如图所示。
下一篇:浮雕字,打造简单的浮雕印章
相关推荐

可爱字,设计可爱的冰淇淋字体教程

可爱字,用PS制作蜂蜜特效的艺术字

可爱字,用PS制作萌萌哒“好吃”的奶

可爱字,通过PS制作可爱的毛绒绒质感

彩绘艺术字, PS液化工具制作彩绘背景设计教程

Photoshop制作非常流行的金沙立体字,细腻的金沙字体,金粉字。

Photoshop制作金色的海报标题文字教程

Photoshop使用笔刷制作书法艺术字教程


